This guide shows you how to make Halloween costume accessories from scratch using inexpensive craft materials. By the end, you will have one or more finished accessories — a headpiece, a prop weapon, wings, armor pieces, or costume jewelry — sized to your body, painted to match your costume, and secured with attachments that will not fail halfway through a party.

Get your wardrobe favorites delivered free with Prime
- Fast, free delivery on millions of items
- Prime Video, Amazon Music and more included
- Member-only deals all year
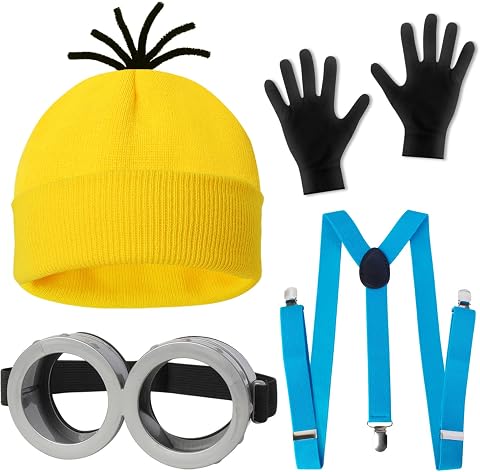
4-Piece Halloween Costume Accessory Set for Adults
- ✔ Included items: Yellow beanie, blue suspenders, goggles, one pair of black gloves
- ✔ Fabric: Polyester
- ✔ Fit: One size fits most; stretchy beanie and gloves

Long Finger Claw Gloves for Halloween Cosplay
- ✔ Material: Spandex gloves; alloy claw rings
- ✔ Claw length: 4.65 inches (11.8 cm)
- ✔ Glove length: 16.9 inches (43 cm)

CICOCI Pirate Costume Accessories Set for Adults
- ✔ Brand: CICOCI
- ✔ Included components: Bandana, large sash, bracelet, necklace, eye patch, earring
- ✔ Material: Linen and cotton blend
This guide is written for beginners. No sewing machine, power tools, or sculpting experience is required. If you can use scissors, a hot glue gun, and a paintbrush, you can complete every project described here.
Plan on 2 to 4 hours of hands-on work spread across one or two days. Paint and hot glue need overnight drying time, so start at least two days before Halloween. Last-minute builds are the single most common reason homemade accessories look rushed or fall apart.
Difficulty: Beginner | Time: 2-4 hours (plus overnight drying time for paint and glue)
What You’ll Need
Tools & Materials:
- Hot glue gun and glue sticks (low-temp for foam, high-temp for wood and fabric)
- Scissors and a craft knife (X-Acto style) with fresh blades
- Self-healing cutting mat or thick cardboard cutting surface
- Acrylic craft paints in your costume’s colors plus black and white for shading
- Paintbrushes (one wide, one fine detail brush)
- Measuring tape and a pencil
- Elastic band, ribbon, or headband for wearable attachments
- Clear matte spray sealant (optional but recommended)
- Wire, bamboo skewers, or dowels for structural support on larger props
Knowledge:
- Basic scissor and craft knife safety
- How to operate a hot glue gun safely (glue is hot enough to blister skin immediately)
- Rough idea of your costume’s color palette and reference images if available
Gather everything before you start. Running out of glue sticks mid-project forces rushed joints that fail later. Buy one extra sheet of craft foam and one extra paint color more than you think you need — mistakes are cheap to redo only if spare material is on hand. Cover your work surface with newspaper or a cutting mat; acrylic paint and hot glue both bond permanently to tables.
Print or pull up 2-3 reference photos of the accessory you want to make. Building from memory produces recognizable-but-wrong shapes. Keep the photos next to your work area the entire time.
4-Piece Halloween Costume Accessory Set for Adults
This set earns our top spot because it solves the most common Halloween problem: assembling a recognizable character from a single purchase. The combination of a yellow beanie, blue suspenders, goggles, and black gloves instantly reads as a certain beloved movie minion — but each piece also works independently for steampunk, mechanic, or aviator costumes. That flexibility is exactly why it outranks the pirate set, which locks you into one theme.Compared with the claw gloves, this set spreads its effect across four pieces rather than concentrating it in one dramatic prop. That makes it the safer choice for costume parties where you want a complete look rather than a single accent. The adjustable suspenders with three metal clips and the goggles’ foam-padded adjustable strap are genuine fit advantages over sets that rely purely on stretch fabric.The tradeoffs are real, though. The goggles are plastic, so they look convincing at party distance but won’t survive rough handling, and the set offers no explicit size options — it leans on ‘fits most’ stretch. If you need a precisely fitted accessory or premium materials, this isn’t the set. For everyone else building a fun, recognizable costume quickly, this pick makes the most sense.
Pros:
- Four coordinated pieces create a complete character look from one purchase
- Pieces work across multiple costume themes, not just one character
- Adjustable suspenders and padded, adjustable goggles improve one-size fit
- Stretchy beanie and gloves accommodate both adults and children
Cons:
- Goggles are made of lightweight plastic that may not withstand rough handling
- No specific size options — relies entirely on ‘fits most’ stretch
Best for: Adults and teens who want a complete, recognizable character look from one affordable bundle
Not ideal for: Buyers who need precise sizing or durable, premium-material props for repeated stage use
Bottom line: The most versatile and complete set in this lineup, and the easiest recommendation for most costume-buyers.
“The most versatile and complete set in this lineup, and the easiest recommendation for most costume-buyers.”
Long Finger Claw Gloves for Halloween Cosplay
Where the other two sets build a costume through many small pieces, this one bets everything on a single dramatic effect — and mostly wins. The 4.65-inch alloy claw rings paired with 16.9-inch stretchy spandex gloves create an instantly menacing look for witch, demon, vampire, or Freddy Krueger-inspired costumes. If your goal is to be memorable at a party without assembling a full outfit, this option stands out for pure impact-per-dollar.Compared with the 4-piece set, the claws are far more specialized. The minion-style bundle offers four versatile pieces; these gloves offer one look done extremely well. The adjustable claw rings are a thoughtful touch — each ring can be sized to individual fingers, which addresses the fit problem that plagues most one-size glove accessories. The machine-washable spandex is also more practical than the polyester pieces in the top pick.The limitations matter, though. The 15-and-over age restriction immediately excludes family costumes with younger kids, and the 16.9-inch glove length is genuinely long — shorter-armed wearers may find the fit awkward. Claws this length also make everyday party tasks like holding a drink genuinely difficult. This model is better suited to solo horror costumes than practical, all-evening wear.
Pros:
- Instantly dramatic 4.65-inch claws create a strong visual impact
- Adjustable alloy rings let each claw be sized to individual fingers
- Machine-washable stretchy spandex gloves
- Long 16.9-inch gloves extend the effect up the forearm
Cons:
- Not intended for users under 15, excluding kids’ costumes
- One size may not fit all adults comfortably
- Long claws significantly limit hand function while worn
Best for: Horror, witch, or fantasy cosplayers who want one high-impact prop instead of a full accessory bundle
Not ideal for: Families with children under 15 or anyone who needs functional hand use throughout the night
Bottom line: The strongest single-effect accessory in this lineup — unbeatable for horror looks, too specialized for anything else.
“The strongest single-effect accessory in this lineup — unbeatable for horror looks, too specialized for anything else.”
CICOCI Pirate Costume Accessories Set for Adults
This set takes the opposite strategy from the claw gloves: instead of one striking piece, it delivers six coordinated accessories — bandana, large sash, bracelet, necklace, eye patch, and earring — that together construct an entire pirate persona. For value-per-piece, nothing else in this lineup comes close, and that’s the core of its appeal.Material quality is where it differentiates itself from the 4-piece set. The bandana and sash use a lightweight linen-cotton blend with seamed edges, which drapes and photographs better than the polyester fabrics in our top pick. If your costume will be photographed or worn on stage, that fabric difference is noticeable. The oversized sash — nearly 12 feet long — offers real styling flexibility, doubling as a belt, waist wrap, or headscarf.The drawbacks keep it out of first place. The listed bandana dimensions are confusing, and the set is strictly pirate-themed: unlike the versatile 4-piece set, you can’t repurpose these pieces for other characters. It’s also adult-sized only, so families with kids should look elsewhere. Still, for themed parties, group costumes, or stage performances where matching pirate looks are the goal, this pick makes the most sense.
Pros:
- Six coordinated pieces build a complete pirate look in one purchase
- Linen-cotton blend fabric with seamed edges looks and drapes better than polyester
- Extra-long sash offers multiple styling options
- Well suited to group and couple costumes
Cons:
- Strictly single-theme — not reusable for other costume ideas
- Listed bandana dimensions may be confusing for sizing expectations
- Adult sizing only, unlike the stretch-fit 4-piece set
Best for: Adults building a pirate costume for themed parties, group costumes, or stage performances
Not ideal for: Buyers wanting multi-theme versatility or children’s costume use
Bottom line: The most pieces and the best fabric for the money, if a pirate theme is exactly what you need.
“The most pieces and the best fabric for the money, if a pirate theme is exactly what you need.”
As an Amazon Associate we earn from qualifying purchases.
Before You Start
Choose one accessory to build first. Beginners who try to make a hat, wings, and a sword in one sitting usually finish none of them well. Pick the accessory that most identifies your character — the hat for a witch, the claws for Wolverine, the crown for royalty — and complete it fully before starting anything else.
Next, decide where on your body the accessory attaches and how: headband, elastic strap, hand-held grip, or shoulder harness. This decision determines the structure of the build, so make it before cutting any material.
Check the weather and venue. An outdoor parade or a crowded party demands sturdier attachments than a photo shoot at home. Foam props tear when squeezed in crowds; add a protective layer or choose tougher attachments if your accessory will take contact.
Step-by-Step Instructions
Step 1: Take measurements for the accessory
Measure your body where the accessory will sit. For headpieces, measure around your head where a headband would rest and note the width available above your ears. For handheld props, measure from your wrist to the floor to find the maximum prop length that will not drag. For wings or back pieces, measure across your shoulder blades and from shoulder to the desired lowest point.
Write each measurement on paper and add one inch to any measurement that involves a strap or wrap. The extra inch gives you overlap for glue joints and adjustable fastening.
Tip: Measure while wearing the costume if it already exists. A wizard hat sized over thin hair will not fit over a wig.
Check: You have written measurements for every dimension of the accessory, with one inch added to strap lengths.
Step 2: Draw the shape at full size
Lay out newspaper, taped-together printer paper, or the back of wrapping paper on the floor. Using your measurements and your reference photos, draw the accessory’s outline at full size in pencil. Draw the inside cutouts (like the gaps in a bat wing or the holes in a mask) as separate closed shapes.
Step back and look at the drawing from a distance. Compare the silhouette against your reference photo. Fix proportions now — a sword that is too thin or wings that are too small look obviously homemade from ten feet away, and corrections after cutting waste material.
Tip: Draw one half of a symmetrical shape, fold the paper on the center line, and cut through both layers. This guarantees a perfectly symmetrical template.
Check: The full-size drawing matches your measurements and looks correct when viewed from across the room.
Step 3: Cut the template and trace it onto material
Cut out your paper drawing with scissors. This is your template. Lay it on your craft foam, cardboard, or EVA foam sheet and trace around it with a pencil. Trace interior cutouts too, marking where to punch through.
Remove the template and check the traced outline on the material one more time before cutting. For thick EVA foam, cut slowly with a craft knife using multiple light passes rather than one hard push — forcing the blade produces jagged edges and slipped cuts.
Tip: Always cut on a cutting mat or scrap cardboard. A craft knife goes through foam and into the table, your floor, or your hand in one stroke.
Check: The cut piece matches the template with clean, smooth edges and no tears.
Step 4: Assemble and add structure
Layer and join your cut pieces with hot glue. Run a thin bead of glue along the joining edge, press the pieces together, and hold for 15 seconds until the glue sets. Build up any layered details — scales, ridges, trim — piece by piece rather than trying to glue everything at once.
For any piece longer than 12 inches (sword blades, staffs, wing spines), embed a support before gluing the halves together: a bamboo skewer, a wire, or a wooden dowel sandwiched in the center. Foam alone bends and flops under its own weight.
Attach the wearing hardware at this stage: glue the headband into the headpiece, sew or glue elastic loops for wrist pieces, or fix a dowel grip into a handheld prop. Pull firmly on every attachment to test it before decorating. If it detaches with hand pressure, it will detach at a party.
Tip: Low-temp glue bonds craft foam without melting it. High-temp guns melt thin foam on contact — test on a scrap piece first.
Check: The assembled accessory holds its shape when lifted by its strap or grip, and you cannot pull the attachments loose by hand.
Step 5: Paint the accessory
Apply acrylic paint in thin coats with the wide brush, working from the largest areas to the smallest. Let each coat dry for 30 to 60 minutes before adding the next. Two or three thin coats cover better and crack less than one thick coat.
Once the base color is fully dry, add depth with the fine brush: darker paint in recessed lines and edges, lighter paint on raised areas and edges facing upward. This shading is what makes flat foam read as metal, wood, or leather rather than painted foam.
Tip: Metallic effects come from layering: a dark base coat, a mid-tone silver over it, then thin streaks of near-black in the grooves. Do not try to achieve metal with one flat silver coat.
Check: Coverage is even with no bare spots, and the shading is visible from several feet away.
Step 6: Seal and do a full dress rehearsal
Once paint has dried overnight, spray the accessory with clear matte sealant in a ventilated area or outdoors, following the can’s directions. Sealing prevents paint from rubbing off on your costume and skin.
Then put on your full costume and wear the accessory for at least ten minutes. Move around: sit down, raise your arms, walk through a doorway, hug someone. Note anywhere the accessory shifts, blocks your vision, or catches on clothing, and adjust straps or trim edges before event day.
Tip: Photograph yourself in full costume under indoor lighting. Photos reveal proportion problems and unpainted spots your mirror misses.
Check: The accessory stays in place through normal movement, leaves no paint transfer on your hands or costume, and the full outfit photographs the way you intended.
Common Mistakes to Avoid
- Starting the project the night before Halloween. — Paint and glue need overnight drying between stages. Begin at least two days ahead, three if you are making more than one accessory.
- Using high-temp hot glue directly on thin craft foam, which melts and warps the foam. — Use a low-temperature glue gun for foam, or test your glue on a scrap piece before applying it to the actual build.
- Building a large prop without internal support, resulting in a sword or staff that droops. — Embed a skewer, dowel, or wire down the center of anything longer than 12 inches before gluing the piece closed.
- Applying one thick coat of paint, which dries unevenly and cracks when the accessory flexes. — Build color with two or three thin coats, allowing drying time between each, and seal with matte spray so paint does not crack off at joints.
Troubleshooting
Problem: A glued joint pops apart during the dress rehearsal.
Solution: Clean off the old glue blob, roughen both surfaces lightly with the craft knife, and reglue with a slightly larger glue bead plus pressure for 30 seconds. For load-bearing joints, add a second attachment method — stitch through with thread or add a zip tie hidden inside the seam.
Problem: Paint will not stick to the foam surface and peels or beads up.
Solution: Some smooth EVA foams resist paint. Lightly sand the surface with fine sandpaper, wipe clean, and apply one coat of white glue thinned with water as a primer. Once that primer dries, acrylic paint will bond normally.
Problem: A headpiece or hat slips and slides during wear.
Solution: Add two anchor points instead of one: glue the piece to a headband and add a hidden elastic loop that goes under the hair at the back, or attach bobby-pin loops made from folded ribbon at each side.
Problem: The accessory looks flat and obviously homemade in photos.
Solution: The problem is almost always missing shading. Go back with dark paint in every recess and edge line, and lighter paint on raised details and top edges. Even simple shading transforms how the piece reads on camera.
What Success Looks Like
Your accessory is complete when all of the following are true: it holds its shape when picked up by its strap or grip; it stays in place through sitting, walking, and arm movement for ten minutes or more; no paint transfers onto your hands, face, or costume; the proportions look right in a full-body photo taken at normal party distance; and it can be taken off and put back on without any part detaching. If it passes all five checks, it will survive a Halloween party.
Next Steps
Store the accessory flat in a box or on a hook where nothing presses against the paint, and it can be reused next year or loaned to friends.
Once your first accessory is finished and tested, apply the same process to a second piece — the template-draw-cut-glue-paint-seal workflow is identical whether you are making a crown, a shield, or a monster claw. Intermediate upgrades worth trying next: a heat gun for shaping EVA foam into curved armor, contact cement for invisible seamless joints, and D-rings with adjustable webbing straps for professional-grade wearable attachments.
Frequently Asked Questions
What is the best beginner material for costume accessories?
Craft foam sheets (2mm) are the best starting material: they cut with scissors, take acrylic paint well, and cost under a dollar per sheet. For rigid props like swords or staffs, step up to EVA foam (5-6mm), often sold as interlocking floor mats, which is thicker and holds structure better.
How do I keep the accessory from falling off while dancing or in a crowd?
Use two attachment points rather than one — for example, a headband plus a hidden elastic band under the hair, or a grip plus a wrist loop on handheld props. Anything worn on the head or body should survive a firm tug test before you leave the house.
Can I make accessories without a hot glue gun?
Yes, but expect longer waits. White craft glue (PVA) works on foam and paper but needs an hour or more per joint to set. Contact cement creates stronger bonds for foam-on-foam, and double-sided tape works for lightweight pieces like paper crowns. Hot glue remains the fastest and most reliable option for most builds.
How do I stop paint from rubbing off on my costume?
Let acrylic paint dry fully overnight, then spray the finished piece with a clear matte sealant. One or two sealant coats lock the paint layer in. If you skipped sealing and already have transfer, wipe the accessory with a dry cloth and seal it before wearing it again.
How much should I expect to spend on materials?
A single accessory typically costs $10 to $20 in materials: foam sheets, a basic acrylic paint set, glue sticks, and a headband or elastic. If you already own a glue gun and paint, costs drop to a few dollars. Buying an extra foam sheet and one spare paint color is worth the small added cost.
Halloween Picks
halloween
As an affiliate, we earn on qualifying purchases.